NFPA 1970 (1971) 2025 mandates that all soft goods affixed to an SCBA be removable by the firefighter for cleaning.
For users of the MSA G1 XR Edition SCBA, ease of soft goods removal is built into the design to support equipment cleaning, help maintain soft goods service life, and enhance overall safety and hygiene.
This guide walks through the G1 soft goods removal process, following a “top-down” approach, to prepare applicable porous, textile-based components for cleaning. It is broken down into five parts:
- Serviceable Shoulder Pad and Pull Strap Removal
- Adjustable Height Lumbar Pad Removal
- Low Profile Lumbar Pad and Pull Strap Removal
- Accessory Pouch Removal
- Remote Quick Fill Sleeve Removal
Before You Begin
MSA encourages departments and users to obtain copies of the current edition of applicable NFPA standards to review for themselves. Also refer to the MSA-provided cleaning guidance resources and materials in the user manual for full details.
Step-by-Step: Removing G1 SCBA Soft Goods
1. Serviceable Shoulder Pad and Pull Strap Removal
- Undo the top pull-the-dot snap located at the top of the shoulder pad by locating the dot and rocking the snap open with the dotted side up first. (See Figures 1 & 2)
- NOTE: The use of directional (“pull-the-dot”) snaps across the shoulder pad component is necessary to allow for removability while ensuring secure attachment in most orientations of pull. The user must pull on a specific side of the snap to release. That specific side is denoted with an indented dot.
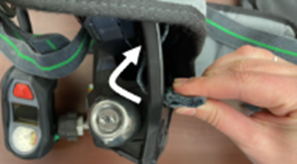
- Slide your hand in between the shoulder pad flap at the location where the “A” is in “MSA”. Dots on all 4 of the snaps along the shoulder pad face this direction. (See Figure 3)
- Remove each pull-the-dot snap by rocking the snap open, away from the center of the pad where the “A” is located. (See Figure 4)
- Repeat this process for the remaining shoulder pad and remove the regulator, speaker module, and control module apparatuses and hoses/wires from the shoulder pad.
- Disconnect the speaker module from the shoulder pad by pulling out the metal U-clip located at the bottom of the apparatus.
- Place the metal U-clip back into the speaker module once removed to avoid misplacing.
- Disconnect the rubber hose tethers located at the top of the SCBA where the tri-folds connect to the G1 backplate via the top backplate slots.
- Reconnect the hose tethers to the backplate to avoid misplacing.
- Removal of the tri-folds (in the next step) is not possible without first the removal of the rubber hose tethers.
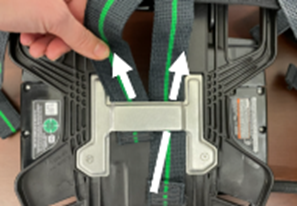
- Locate the shoulder pad tri-folds at the top backplate slots. Pull and fold flat to slide through the top backplate slots to free the shoulder pads completely from the SCBA. (See Figure 5)
- Locate the shoulder pull strap tri-folds at the bottom backplate slots. Pull and fold flat to slide through the bottom backplate slots to free the shoulder pull straps completely from the SCBA. (See Figure 6)
- Access to the bottom backplate slots may be easier with the adjustable lumbar pad in the top-most position, if applicable.
- It is not recommended that the shoulder pull straps be removed from the shoulder pad assembly for washing.
Figure 1

Figure 2
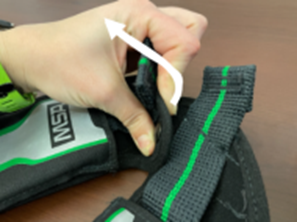
Figure 3

Figure 4

Figure 5
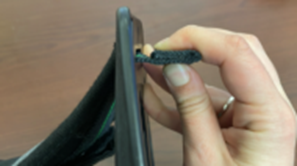
Figure 6
2. Adjustable Height Lumbar Pad Removal
- Pull the left side of the lumbar pad to the center of the G1 backplate to gain access to the tri-fold located in between the lumbar pad and the backplate. (See Figure 7)
- Pull tri-fold and fold flat to slide through the attachment slot. (See Figure 8)
- Repeat this process for the right side of the lumbar pad.
- With both tri-folds free from the slots, slide the lumbar pad right then left to remove the pad retainment straps from the plastic plate, freeing the pad completely from the SCBA.
Figure 7

Figure 8

3. Low Profile Lumbar Pad and Pull Strap Removal
- Fold the left side of the lumbar pad to the center of the G1 backplate to gain access to the tri-fold located in between the lumbar pad and the backplate. (See Figure 9)
- Pull and fold flat to slide through the attachment loop.
- Repeat this process for the right side of the lumbar pad. (See Figure 10)
- With both tri-folds free from the loops, flip the bottom of the lumbar pad up to reveal the back side of the pad.
- Remove both left and right tri-folds from the retainment straps. See Figure 11)
- Remove the left tri-fold from the metal cross-bar, followed by the right tri-fold. Remove the tri-folds one at a time. (See Figure 12)
- Remove the plastic regulator keeper from the waist pull strap via the slots on the back side of this component.
- NOTE: It is not recommended that the waist pull straps be removed from the lumbar pad assembly for washing.
Figure 9
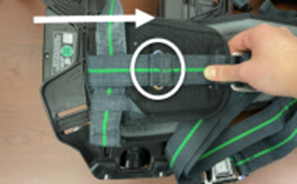
Figure 10
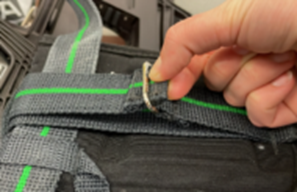
Figure 11
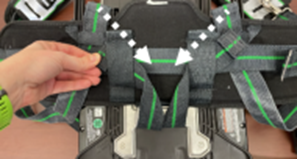
Figure 12
4. Accessory Pouch Removal
- Open the pouch flap snaps and hook + loop to deploy in its entirety the hose and manifold assembly.
- Extendaire II only: Remove the dust cover from the manifold assembly and Extendaire II Airline Adaptor, if applicable, before feeding the hose and manifold through the lower opening.
- NOTE: The manifold will not come out of the lower opening unless the dust cover has been removed. (See Figure 13)
- The pouch has 3 distinct connection points to the G1 SCBA
- [A] back loop: that connects to shoulder pull strap
- [B] top strap: that connects to the backplate handle
- [C] bottom strap: that connects to the lumbar pad (See Figure 14)
- Locate the back loop [area A] and feed the bottom tri-fold on the shoulder pull strap through the loop by pulling and folding it flat, removing the strap from the loop. (See Figure 15)
- Pull and fold flat the tri-fold at the top strap [area B] location of the pouch.
- Pull and fold flat the tri-fold at the bottom strap [area C] location of the pouch.
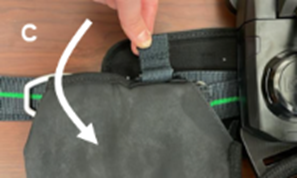
- NOTE: Access to the tri-fold at the bottom strap may be easier with the pouch flipped downward to reveal its back. (See Figure 16)
Figure 13

Figure 14
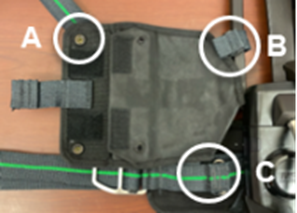
Figure 15
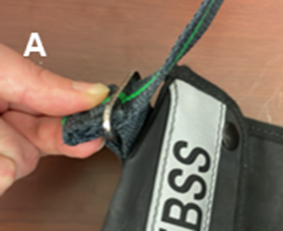
Figure 16
5. Remote Quick Fill Sleeve Removal
- Rotate the sleeve in either direction to expose two snaps.
- Undo both snaps to release the Remote Quick Fill Hose from the shoulder pull strap.(See Figure 17)
- Remove the sleeve momentarily from the shoulder pull strap to pull and fold flat the shoulder pull strap tri-fold through the Remote Quick Fill manifold buckle loops.
- NOTE: It is recommended that the sleeve be reattached to the shoulder pull strap for washing. (See Figure 18)
Figure 17
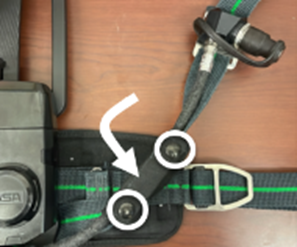
Figure 18

Washing G1 SCBA Soft Goods
Once all components have been removed, commence washing by following all instructions found in the SCBA user’s manual. Ensure you are using the proper detergent, washing machine, water temperature, wash cycle, and any other guidelines provided in the instruction materials.
More information on cleaning the G1 SCBA can be found on the G1 SCBA Cleaning Instructions Online Help page.
Recommended for You